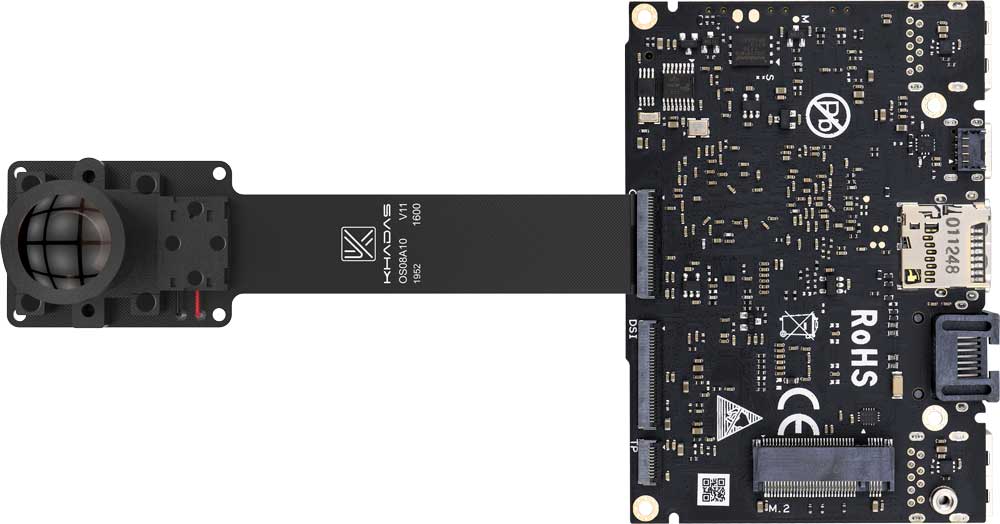
How To Connect MIPI Camera
Attaching a camera for the first-time to VIM3’s MIPI-CSI header? Refer to this picture:
NoteThe reverse connection will burn the camera, please check the connection of the picture carefully before connecting
User MIPI Camera via Guvcview
Open Guvcview
The desktop version has Guvcview pre-installed, find and open this software in the software list.
![]()
Guvcview Setting
The name of the MIPI camera is Juno R2.
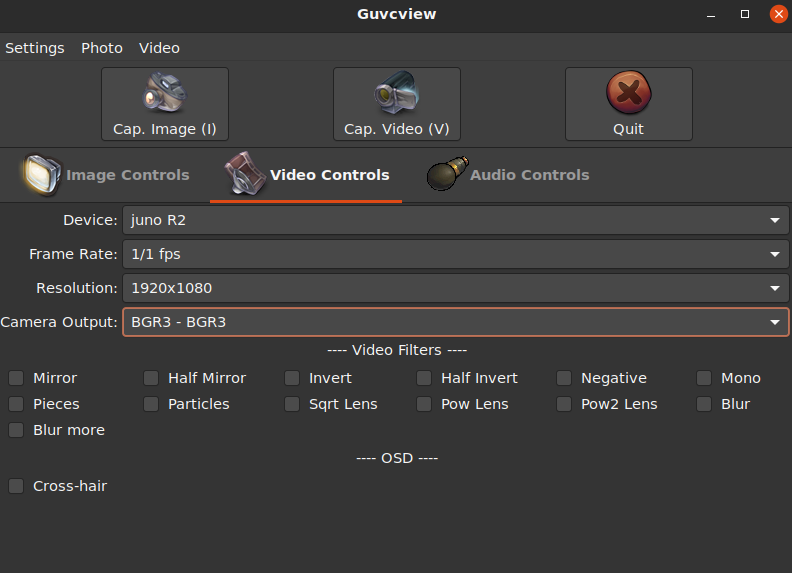
The resolution is set to 1920x1080 and the RGB format is BGR3-BGR3.
After the setting is successful, you can use the camera normally.
Test IR-Cut
You can test IR-Cut via v4l2
The test needs to be conducted in the framebuffer mode, and switch to the framebuffer mode through the keyboard combination of Ctrl+Alt+F1.
disable IR-Cut
1 | v4l2_test -c 1 -p 0 -F 0 -f 0 -D 0 -R 1 -r 2 -d 2 -N 1000 -n 800 -w 0 -e 1 -I 0 -b /dev/fb0 -v /dev/video0 |
enable IR-Cut
1 | v4l2_test -c 1 -p 0 -F 0 -f 0 -D 0 -R 1 -r 2 -d 2 -N 1000 -n 800 -w 0 -e 1 -I 1 -b /dev/fb0 -v /dev/video0 |
Record Video via Gstreamer
1 | $ gst-launch-1.0 v4l2src name=vsrc device=/dev/video0 ! video/x-raw,width=1920,height=1080,framerate=60/1,format=RGB ! filesink location=.//test.rgb |
The recorded video is saved intest.rgb.
Use MIPI Camera via opencv
Python
The source code with python
1 | import cv2 |
C++
The source code with C++
1 |
|
compile command:
1 | $ gcc -o mipi mipi.cpp -lopencv_imgproc -lopencv_core -lopencv_videoio -lopencv_imgcodecs -lopencv_highgui -std=c++11 -std=gnu++11 -Wall -std=c++11 -lstdc++ -I/usr/include/opencv4 |
How to run:
1 | $ ./test /dev/videoX |
Learn More: